পৃষ্ঠাসমূহ

শুক্রবার, ৩০ আগস্ট, ২০১৩

Create a bootable CD or DVD with or without floppy

With the CD-ROM available on almost every computer nowaday, floppy drives become a history. However, for those who find computers a hobby, might run into a situation when they need to create a bootable CD that works just like the old floppy disk. Unfortunately, to do this, you still need a floppy drive to read your bootup floppy disk. Wait, the good news is, you can just down load a bootable ISO image and burn it to a CD. And even better, we have a copy of an ISO image right here. You can download this image and follow the instructions below, or you can do a web search for more options.
The information on this article will guide you step-by-step how to create a bootable CD/DVD, either using a bootup floppy disk or a boot image file. You will end up having a bootable CD or DVD, with CD-ROM driver supported, that could startup your PC and bring up the command prompt. This is going to be a good starting point, then you can run other utilities such as hard drive ghost, etc..
Many current CD/DVD burning software support the bootable feature. If you already have your favorite burning software, look around to find the bootable option. For this article, I will use the steps and sample screen-shots with the burning tool called Nero.
You will need a boot disk (floppy) or a bootable ISO image to start. If you don't have one, you can download an ISO image here. This boot image is Windows-98 based, which means it uses the Windows 98 bootup sequence, which should do what we need. You can also download different boot disk images from the internet. I've found bootdisk.com has a very good collection.
I assume that you already have Nero installed. Also, it is highly recommended to use a rewritable disc so you can redo the process if you have to.

  1. Launch Nero Burning ROM
  2. At the New Compilation Window, select "CD" from the drop-down menu and select "CD-ROM (Boot)" for CD, (or select "DVD" and "DVD-ROM (Boot)" for DVD)


  3. If you use a bootup floppy disk, insert the floppy disk and select "Bootable logical drive..."


  4. If you use an image file, select "Image File" then click "Browse" to browse to the image.

    At the "Open" Window, browse to the location where you saved the boot image and choose the image you wish to use and click "Open" (you might need to change the "Files of type" to "All Files" in order to see files with different extensions.)


  5. Click "New" at the New Compilation Window.
  6. Nero New Compilation Window disappears and Nero brings up its main screen where you can add more files to the CD/DVD if you wish. For example, adding a "ghost" folder with the file "ghost.exe" as follows.
    Once you're done adding all the files you wish to, click on the "Burn" icon.


  7. At the "Burn Compilation" Window, select "Burn"!
Convert Any Document or Web Page to PDF

Somebody just told you that you need to have Adobe Acrobat (Writer) to create a PDF file? Guess what, you can get away from that pricey piece of software if you just need to convert some documents to pdf, without a need of fancy editing the pdf document.
Here's how. Thanks to the BullZip, who provides a Free Pdf printer. With this free tool, you can simply "print out" your document or webpage to a pdf file, just about the same way as you print it out to a printer.

You can visit BullZip.com for more information about the software.
Here the direct link to BullZip downloads page: Downloads
  1. To get started, first follow the link above and download Free Pdf Printer from BullZip, then install it to your computer.
  2. Once you're done, you might need to close the program (or the web browser) which you're currently viewing the document. This helps refreshing the list of available printers on your computer.
  3. Once you get back to the document you want to convert, perform the same steps are you print out the document, i.e. File > Print ...
  4. When you see the Print window pop-up, select "Bullzip PDF Printer" under "Printers", then click "OK".
  5. BullZip PDF Printer will then start to analyze your document and display a new pop-up window, where you can direct it to the location you want to save the pdf file.
  6. Follow the pop-up windows and.. hola! The PDF document is created!

বৃহস্পতিবার, ২৯ আগস্ট, ২০১৩

Block unwanted website:

Lets assume you need to block certain sites like Facebook, Orkut or any other site. We will Block certain Websites without using any software. We will directly edit the hosts file in windows, which will help us to Block any site.

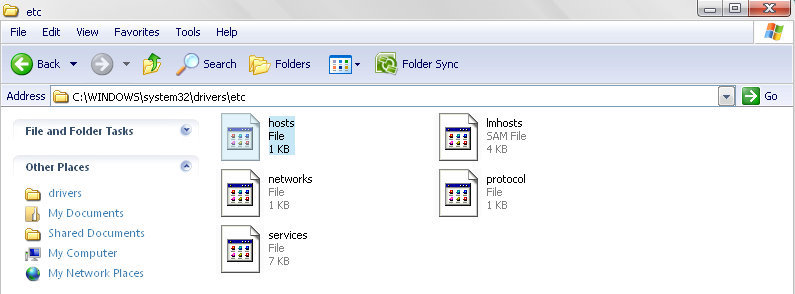
1. Navigate to C:\Windows\System32\drivers\etc


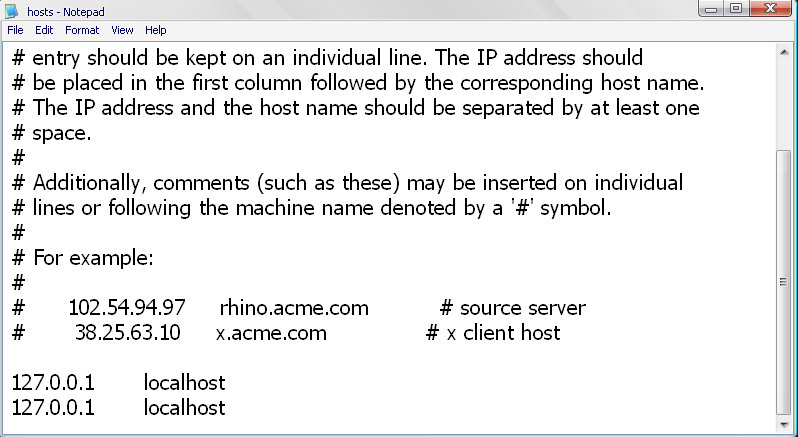
2. Open hosts file with any Text Editor (Open with Notepad).


You will see these two lines in the file

127.0.0.1       localhost

127.0.0.1       localhost

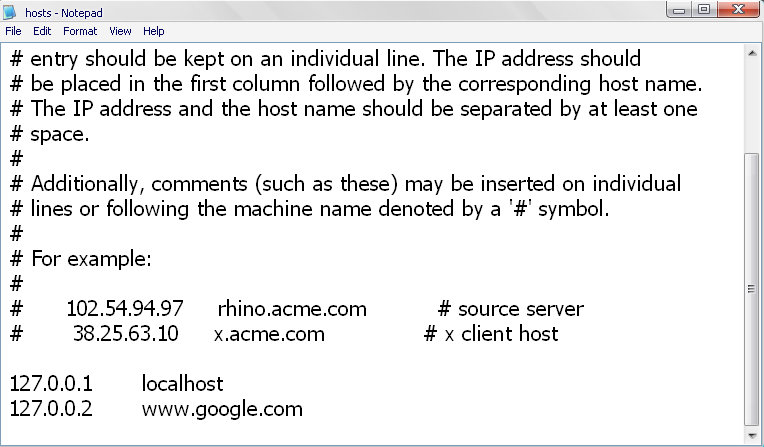
Now Append the Second line with 127.0.0.2 and the website address you want to block.


For Example


We have changed the Second Line as

127.0.0.2        www.google.com 


3. Now Save the hosts File and Restart your Computer.

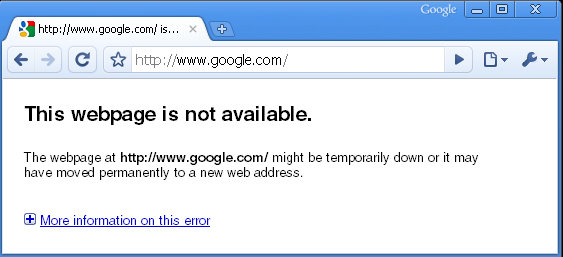
Now Open Google in any Browser, See It is Blocked on you Computer.


You can Block multiple websites by changing hosts file

For Example :-

127.0.0.1       localhost
127.0.0.2       www.google.com 
127.0.0.3       www.yahoo.com
127.0.0.4       www.facebook.com

বুধবার, ২৮ আগস্ট, ২০১৩

Use keyboard as mouse:

1. Go to Start -> Control Panel to get to the screen as shown below. (There would be slight variations in the menu options in different operating systems. This tutorial is based on Windows 7 operating system.)
control panel options windows seven
2. Click on Ease of Access and you will be redirected to a new screen. Now click on Ease of Access Center and again you will be redirected to a new screen as given below.
ease of access make the mouse easier to use
3. Click on Make the mouse easier to use and you will be redirected to a screen. Select the Turn on Mouse Keys check box under Control the mouse with the keyboard option. Now your will see a new screen.

4. If you wish to customize any of the mouse settings, you need to click Set Up Mouse Keys link and make the required changes. You can adjust the speed and acceleration of mouse pointer, turn on or turn off keyboard shortcut for Ease of Access setting, display a warning message when mouse keys are turned on etc.
After making all required changes, click Apply and then OK button. Now your keyboard is ready to use as mouse.
5. You can click ALT+SHIFT+ NUM LOCK to activate your mouse keys instantly. When you click ALT+SHIFT+ NUM LOCK, you will get a screen as given below and once you click Yes button, your mouse keys will be turned on.

6. On your numeric keypad, you need to press 4, 6, 2 and 8 to move the cursor left, right, down and up respectively. Press 1, 3, 7 and 9 to move your cursor diagonally and 5 to click the mouse after you select the click type. You need to press “/” to left click the mouse and press “-“ to right click the mouse.
If you are trying the above steps on your laptop, then your laptop should have a numeric keypad that can be enabled by pressing the NUM LOCK key or the FN key.

মঙ্গলবার, ২৭ আগস্ট, ২০১৩

Before I start to tell you how to download subtitles of any movie in vlc player. Let me tell you something about VLsub. In actual, VLsub is an extension for vlc player which enable the user to download subtitle of current playing movie. You just need to install this extension and internet connection on your computer to download subtitles. Okay , I think it is enough information to understand this post. I have arranged this post into some steps and also I shared  a Video tutorial below in the post. If you face any problem in any step then just your comment below so that I can help you. Okay lets start...

way2hacking+vlc+player
STEP 1:
First of all download VLsub extension on your computer. 


STEP 2:
Now when you will open downloaded file you will see that it is zipped file so our next step is to unzip it using winrar or any unzipper program.  
STEP 3:
I think hopefully, You have done above steps. Then you will get these files as shown in below screenshot.
DOWNLOAD+SUBTITLES+OF+ANY+MOVIE+IN+VLC+PLAYER+USING+VLSUB
STEP 4:
Okay, now question is that how to install it in vlc player. For this , you have to follow these points.

  • Copy vlsub.lua extension file.

  • Now open this path Program FIles>>VideoLAN>>VLC>>lua & make a new folder with extensions name [Note: If you are using WINDOWS OS then just open run command using WIN + R and write this
    command %ProgramFiles%\VideoLAN\VLC\lua\]
DOWNLOAD+SUBTITLES+OF+ANY+MOVIE+IN+VLC+PLAYER+USING++VLSUB
  •  Now just paste vlsub.lua extension file to this folder.
STEP 5:
You have almost done, now I am going to show you how to use it. To use this extension just open any video using VLC player. Now click on VIEW from menu bar. Here you will see same extension name i.e VLsub. Just click on that to search movie's subtitles.
DOWNLOAD++SUBTITLES+OF+ANY+MOVIE+IN+VLC+PLAYER+USING+VLSUB

DOWNLOAD+SUBTITLES+OF+ANY+MOVIE+IN+VLC++PLAYER+USING+VLSUB

Windows gadget


STEP 1.
First of all download DesktopGadget Software of size ~5MB. To Download click here.


STEP 2.
Now install it on your windows 8 device.


windows+7+like+desktop+gadget+in+windows+8
windows+7+like+desktop+gadget+in+windows+8+
windows+7+like+desktop+gadget+in+window+s+8+

windows+7+like+desktop+gadget+in+window+s+8++

That's It.

Now you can enjoy Windows 7 like desktop gadget on Windows 8.


Delete Windows.old Folder

Hi friends, If you recently install windows on your computer without formatting partition then you are seeing a folder named Windows.old . In this folder previous version of windows is stored. Now if you do not want to see this folder any more then I have a solution for you. You have to do DISK CLEANUP in this case. How ? , Let me tell you .., Just read and follow these steps..


Windows.old-folder1


STEP 1.
First of all click on Start Button and type DISK CLEANUP here.
Hit enter 
disk+cleanup+-+www.way2hacking.com


STEP 2.
Now select Windows Drive (e.g. C: ) and click on OK
disk+cleanup+-+www.way2hacking.com+

STEP 3.
Now DISK CLEANER UTILITY will scan your disk, so just wait for some time.


STEP 4.
Now below type of type of dialog will come in front of you, Here just scroll down and check PREVIOUS WINDOWS INSTALLATION and click on OK.
disk+cleanup+-+www.way2hacking.com++

STEP 5.
After that a dialog will pop up will ask you to DELETE FILES. Just proceed it .
That's It.
disk+++cleanup+-+www.way2hacking.com++


Now Check Windows.Old folder in your drive , I am sure it is no more there

Avoid windows hang

অনেক সময় এমন হয় আপনি কম্পিউটারে কাজ করছেন দেখা গেল হঠাৎ করে কম্পিউটারের প্রোগ্রাম’টি থেমে গেছে কাজ করছে না। যাকে বলা হয় হ্যাং হয়ে যাওয়া। ম্যাসেজ দেখায় Not Responding তারপর আর কোন উপায় থাকে না বাধ্যতামূলক হ্যাং হওয়া প্রোগামটি বন্ধ করতেই হবে


এটা সবার কাছেই চরম বিরক্তিকর। আজই মুক্তি নিন এই বিরক্তকর জামেলা থেকে!!

এর জন্য প্রথমে আপনাকে Start > থেকে> Run থেকে regedit লিখে Enter চাপুন।


এর পর আপনি HKEY_CURRENT_USER > Control Panel > Desktop এ যান


এবার ডানপার্শ্বের AutoEndTask অপশনে ডাবল ক্লিক করুন এবং এখানে Value data হিসাবে 0-এর পরিবর্তে 1 লিখুন। OK দিয়ে বের হয়ে আসেন।


ব্যাস হয়ে গেল… এখন আসাকরি আর হ্যাং হবে না আপনার কম্পিউটার....

Use Notepad as diary

নোটপ্যাড ওপেন করুন এবং লিখুন .LOG । খেয়াল করবেন অবশ্যই ক্যাপিটাল লেটারে লিখবেন
এবার যেকোন নামে সেইভ করুন। ফাইলটি ওপেন করুন...প্রতিবার যখন ওপেন করবেন দেখবেন নোটপ্যাডটিতে ডায়েরীর মতো উপরে সময় ও তারিখ আসছে....প্রতিবারই সময় ও তারিখ পরিবর্তিত হবে....এটিকে আপনার ডায়েরি হিসেবে ব্যবহার করতে পারেন...(চিফ অকাজের ট্রিক্স)

Folder lock

1. সফটয়ার ছাড়াই ফোল্ডার লক
মনে করুন আপনি যে ফোল্ডার লক করবেন তার নাম Love এবং এটি রয়েছে E ড্রাইভে,তার মানে এর path E:\love
ফোল্ডারটি লক করার জন্য ডেস্কটপে নোটপ্যাড ওপেন করুন start > all programes > accessories > notepad
নোটপ্যাড ওপেন হলে লিখুন- ren love love.{21EC2020-3AEA-1069-A2DD-08002B30309D}
নোটপ্যাডটি lock.bat নামে সেভ করুন।
এবার আরেকটি নোটপ্যাড ওপেন করে লিখুন ren love.{21EC2020-3AEA-1069-A2DD-08002B30309D} love
► দ্বিতীয় নোটপ্যাডটি key.bat নামে সেভ করুন

তৈরীকৃত lock.bat ও key.bat ব্যাচ ফাইল দুটি E ড্রাইভে নিয়ে আসুন।  এখন lock.bat ফাইলে ক্লীক করলেই ফোল্ডারটি লক হয়ে যাবে।আর ফোল্ডারটি আনলক করতে key.bat ফাইলে ক্লীক করুন

Download anything


** install in your Computer


** Open the program file :


** go through : Downloads ---->Options ----> File Types


** Find this line in the newly opened windo : "Automatically start downloading the following file types:"


** in the file types box, write your desired file extention name : such as , for song - add MP3 ... or, for youtube video - add FLV .. for pdf file - add PDF


** click "ok" and close the dialog box

** Now test....

go to any youtube video and click on it (some time no need to click) or in esnips.com or saimum.saimum.net.. click on any link of song..

the .mp3 or .flv files should be started to download in your harddisk immediately ....

সোমবার, ২৬ আগস্ট, ২০১৩

Increase internet speed by 20%

Microsoft reserves 20% of your available bandwidth for their own purposes like Windows Updates and interrogating your PC etc. By unreserving this bandwidth, you can make your internet connection faster. By 20%. The steps to do so are –

1. Click Start then Run and type "gpedit.msc" without quotes.

2. Then go to Local Computer Policy>Computer Configuration>Administrative Templetes>Network>QoS Packet Scheduler. Click on QoS Packet Scheduler. In the right side , find Limit Reservable Bandwidth and double click on Limit Reservable Bandwidth.

3. It will say it is not configured but the truth is under the ‘Explain’ tab. Select ‘Enable’ and set reservable bandwidth to zero.

4. Click on ‘Apply’ and your internet speed will boost up by 20%.

মঙ্গলবার, ২০ আগস্ট, ২০১৩

How to make bootable pendrive

STEP 1
First of all download and install this software
PowerISO.exe (5.38 MB)


STEP 2
Now run the program and insert your pen drive to your PC.
Click on TOOLS from menu and select Create Bootable USB Drive as shown in below image


STEP 3
Now just select any .ISO file as source file and your pen drive as destination boot able USB drive (Make sure that your pen drive is empty otherwise you will loose all data present in your pen drive)


STEP 4.
Now just click on start.

Wait for some time ..


That's it , your bootable pendrive is ready..

Access your andriod phone from PC


STEP 1:
First of all you have to download and Install an Android app on your phone named AIRDROID.
HOW+TO+ACCESS+YOUR+ANDROID+PHONE+FROM+YOUR+PC


STEP 2:
Now just REGISTER an account on app. [Note:- Please Remember your password and do not share with anyone.]


STEP 3:
Okay I hope you have successfully done above steps. Now just open Google Chrome Browser on your PC.


STEP 4:
Now install AIRDROID extension on your Google Chrorme.
HOW+TO+ACCESS+YOUR+ANDROID+PHONE+FROM+YOUR+PC


STEP 5:
Now you will get below type of screen in front of you. It means you have almost done.
HOW+TO+ACCESS+YOUR+ANDROID+PHONE+FROM+YOUR+PC


STEP 6:
Okay Now just scan the QR code using your phone camera. You have to just open AIRDROID app on your phone and AIRDROID extension on google chrome to scan QR code 
HOW+TO+ACCESS+YOUR+ANDROID+PHONE+FROM+YOUR+PC+(3)HOW+TO+ACCESS+YOUR+ANDROID+PHONE+FROM+YOUR+PC+(2)
STEP 7:
Now just enjoy wireless access on your phone by opening AIRDROID APP on chrome[You can get it on APP TAB in google chrome]
HOW+TO+ACCESS+YOUR+ANDROID+PHONE+FROM+YOUR+PC+(2)


বৃহস্পতিবার, ১ আগস্ট, ২০১৩

Disable windows error reporting:


This is 1 of boring and disgusting problem of our PC. Now I am showing you the mechanism to disable it ...


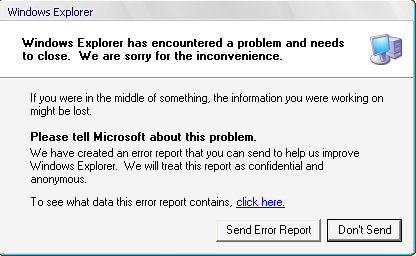
Error reporting works by prompting you after a critical error in the operating system or in other programs and asking permission to notify Microsoft about it. This way, Microsoft can gather technical information about serious errors from millions of users, helping them develop fixes and service packs.


If you'd like to disable error reporting, follow the easy steps outlined below.

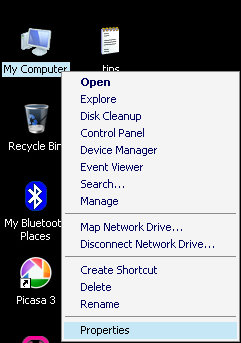
1. Right Click on My Computer Icon and Select Properties.


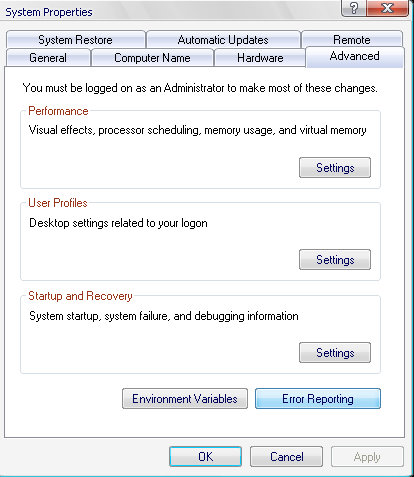
2. In the System Properties window, click on the Advanced tab.
3. Near the bottom of the window, click on the Error Reporting button.


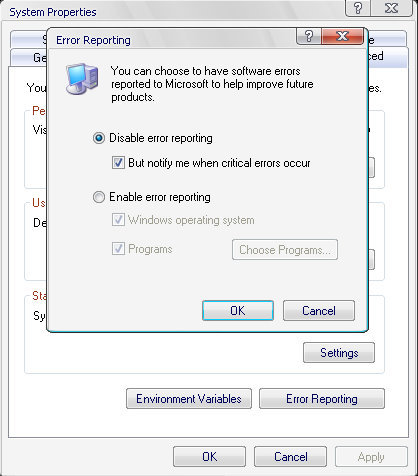
4. In the Error Reporting window that appears, choose the Disable error reporting radio button and click the OK button.


 আমার দেওয়া তথ্য দ্বারা যদি আপনারা উপকৃত হন তাহলেই আমার কষ্ট  সার্থক হয়েছ বলে আমি ভেবে নিব ।
আর আমার লেখনিতে যদি কোন ভুল থেকে থাকে তাহলে তা দয়া করে কমেন্ট এর মাধ্যমে অথবা E-mail এ জানান। এতে করে পরবর্তীতে আমি এ বিষয়ে আরও সতর্কতা অবলম্বন করব।
ধন্যবাদ আমার ব্লগ এ আসার জন্য......


Md. Monirul Islam
B. sc. in CSE